Jes, Kevin - two things that you guys are miscommunication on a bit;
1) Kevin, you were likely applying the ball-joint-flanges directly to the chassis and will run in to problems that way. Jes, on the ones that we have done ghere we used a combination of Ron (RSR) steel plates and aluminium spacers from Andy (Performatek...)
They allow you to space the ball-joint back from the chassis so that the mis-alignment of the hole in the chassis becomes inconsequential. The aluminium spacer on the wheel-well side is visible in Jes' pic above.
2) Jes, it was the thick aluminium spacers that we had to grind a bit off of (on the one ear each, both sides - wheel-well side), to make room for it to fit properly in the corner of the castor-rod mount-box opening....
-
junglejustice

- Verde

- Posts: 624
- Joined: Fri Nov 26, 2004 1:19 am
- Location: Granolaville, WA

John, no miscommunication. On my cars I have always rounded the corner on the aluminum spacer from Performatek. However, I have also had to grind off a bit of one ear on the actual ball joint in some cases. This was to get it perfectly centered in the stock castor rod chassis opening. As for the engine bay side you can use whatever piece of metal you have laying around (cut to size) to reinforce if you like.junglejustice wrote:Jes, Kevin - two things that you guys are miscommunication on a bit;
2) Jes, it was the thick aluminium spacers that we had to grind a bit off of (on the one ear each, both sides - wheel-well side), to make room for it to fit properly in the corner of the castor-rod mount-box opening....
Jes
87 Milano Verde - daily driver - Juliet
87 Milano 3.0 Motronic - budget race car - Roxanne
87 Milano 3.7 24v - race car
(Repeat or do as I say at your own risk - be critical)
87 Milano 3.0 Motronic - budget race car - Roxanne
87 Milano 3.7 24v - race car
(Repeat or do as I say at your own risk - be critical)
Your both right. I never used the spacer thats why it was so difficult to get the ball joint flush. With the spacer it does not have to be centred which make life much easier and you will still take a bit of the one ear.
The adjustable torsion bars are brilliant if you are a torsion bar fan. Set ride height in ten mins what a pleasure. Should have been a stock item on all 116's.
The adjustable torsion bars are brilliant if you are a torsion bar fan. Set ride height in ten mins what a pleasure. Should have been a stock item on all 116's.
The camber arm only touches when you are trying to slide the whole back member onto the two bars which I already had fastened in the wish bones. It only touched slightly but when its in there is a lot of clearence. I was thinking I should have assembled back first then pushed it into the wish bones as there were still loose. There was no hammering or bending of anything. I started making laser drawings for the levers but never finshed sadly.
-
junglejustice
- Verde
- Posts: 624
- Joined: Fri Nov 26, 2004 1:19 am
- Location: Granolaville, WA
On the rear (if you're going to go through the cut-and-weld exercise that I am going through now) you want;
4mm of total toe IN
2.5 to 3.0 degrees of negative camber
castor doesn't change obviously -
On the front;
3-4 degrees of negative camber
2mm of total toe IN
The castor becomes pretty much a fixed variable with the limited opening in the upper control arm... When you position his coil-over pretty much in the center of the opening (with the lower "F" bracket slightly loose, to allow you to move things around a bit), you end up with about 5-6 degrees of castor.
You could remove that lip on the UCA and open it up a bit to give you more room (or are you running your "open" half-moon UCAs...?)
...to Alfa, or not to Alfa? That is the question...
Thanks JJ, my only problem is castor. Stuck on 4 deg, had to do some panel beating and remove the inner splash guard to get that. The problem is i used a 15mm wheel spacer to help clear the caliper and by bring the wheel out as it catches much easier on the insides. The wheel is 15'' with 205/50 semi slicks.Im using the origional uppers cut to a bigger diameter. I do regret using 315mm, should have trimmed the discs down to 305mm and would have no problems using 15'' rims. If i find buyers for all my 15'' rims i will chainge to 16''as I found a rule in our regs which allows you to go one inch bigger but you have to use a rim from the same era.(1980-1985)
Got alignment done and went for a few laps around the neighbourhood. Konrad brought his 3.0l carbi along. All his car needs is to be lowered and its track ready as all the other prep has been completed. I have to put a sound clip of these cars or a video as they all sound great. Tracks must open soon !!
- Attachments
-
- kev&kon.jpg (132.04 KiB) Viewed 7541 times
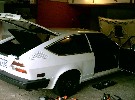
Got only 60mm under sump guard to ground which is 15mm away from aluminium square sump. Cant make these sumps any shallower as the oil pick ups are really deep on these 166 motors. Dont think the sump guard will do much but I am working on lighter stronger one as there is one chicane at our track which if you catch it wrong I will be minus one sump.
- Attachments
-
- kevside.jpg (124.87 KiB) Viewed 7543 times
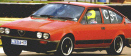
Happy New Year to you Kevin.Just had to compliment you on your race car,it's looking absolutely stunning.I see you have my all time favourite Compomotive mags now fitted to your baby. 
Let me know when your first track outing takes place,as I would definatly want to see your car in action ?
Let me know when your first track outing takes place,as I would definatly want to see your car in action ?
"Racing is life,everything before and after is just waiting."- Steve Mqueen
Need help guys. If you accelerate slowly and then take your foot sudenly off the accelerator there is this clunking sound as though the gearbox is hitting the body. I have new gearbox mounts and a new dedion centre bush(powerflex bush) which I think covers the main movement points. I had this problem in my last race but I thought that when I put in my new LS box with copper clutch which I did two days ago, I thought this problem would go away as I put everythingback 'correctly' and the clunking is still there.
Any thoughts or ideas are welcome.
Any thoughts or ideas are welcome.
-
Giuliettaevo2

- Verde
- Posts: 790
- Joined: Sun May 08, 2005 11:56 pm
- Location: Netherlands